
The Droplets-ATG Dynamo Bridge
Overview
Application Development
Deployment
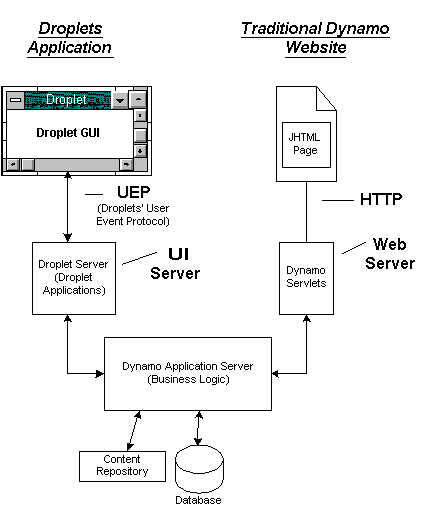
The Droplets Java SDK includes a Bridge that allows you to deploy the Droplets Platform in conjunction with the ATG Dynamo application server. Using this Droplets-Dynamo bridge, Droplets UI Servers (presentation layer) can interact seamlessly with Dynamo application servers (business logic), and your UI logic can access Dynamo components just as if it were a Web request.
The Droplets-Dynamo
Bridge lets you replace traditional Web deployments with
the rich, component-based experience of the Droplets Platform
You'll also need a few key files in order to deploy Droplets with the
Dynamo application server. This includes the actual Droplets-Dynamo
Bridge, which allows Droplets applications to maintain an open Dynamo
session and access session-scoped components, privileges that are otherwise
reserved for HTTP (Web) applications, along with two helper files
described below.
This document assumes a knowledge of basic Dynamo concepts, most notably the difference between "session-scoped" and "global-scoped" components — and some basic familiarity with Servlets and the Dynamo Server's Classpath. For more information on Dynamo, see www.atg.com.
Overview
The Droplets-Dynamo Bridge is a mechanism for integrating Dynamo ATG-based applications with Droplets Platform UIs. The Bridge resides on the Dynamo application server, along with two additional files (outlined in Deployment below).
The Dynamo ATG application server is designed to support Servlet-based Web applications making HTTP requests to Dynamo components. The Servlets call Dynamo components and are thus able to transmit Web page updates based on the application logic.
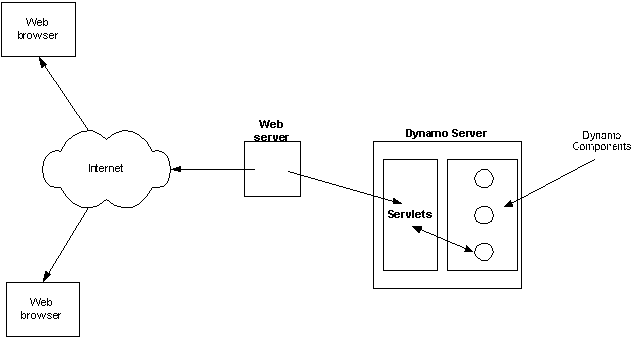
In a traditional,
Web-based Dynamo deployment, the Web server makes requests based on user events,
accessing Dynamo components via Servlets over HTTP.
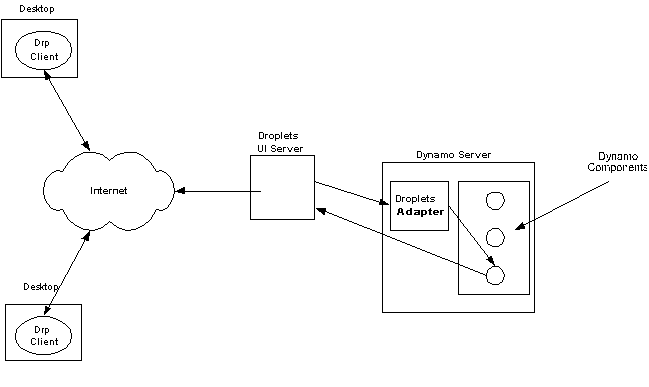
The Droplets-Dynamo Bridge allows you to replace this Web-based setup with the Droplets Platform's component-based UI architecture. In this scenario, the presentation layer of your Internet application resides on the Droplets UI Server, with the rest of your business logic remaining unchanged on the Dynamo Server. A "Droplets Adapter" file (the actual Bridge) resides on the Dynamo Server and mediates communication between the Droplets UI Server and Dynamo components, without requiring any intervention by your developers. The only portion of your pre-existing Dynamo application's code that will have to be altered to work with the Droplets Platform is the presentation layer — all other application logic will remain the same.
With the
Droplets-Dynamo Bridge, the Droplets Platform replaces Servlets with its Adapter
file,
which allows Dynamo to serve business logic to Droplets UIs without further
configuration.
The Droplets-Dynamo Bridge Java API contains five separate classes:
- DynamoSessionAdapter:
Resides in the Droplets Server. Represents an active connection between a
Droplets application and an ATG Dynamo Server. This class represents a single
Dynamo session, and when it is destroyed the Dynamo session ends. It thus
allows Droplets front-ends access to Dynamo's "session-scoped" components.
- DropletDynamoBridge:
Resides in the Dynamo Server. The remote interface implemented by the Bridge
component, which sits inside Dynamo servicing requests from instances of DynamoSessionAdapter.
This interface is used behind the scenes by the adapter. Droplet application
code never needs to interact with instances of this class.
- DropletDynamoBridgeImpl:
This is the implementation of the server portion of
Droplet/Dynamo Bridge. A Dynamo component of this type should be registered
under the nucleus name /com/droplets/dynamo/DropletDynamoBridge.
As with DropletDynamoBridge,
Droplets application code need never interact with instances of this class.
- SessionCreationException:
Exception thrown when an attempt to create a Dynamo session fails.
- InvalidSessionIDException: Exception thrown to indicate that an invalid Dynamo Session ID has been used.
In addition to the two exception classes outlined above, the methods of DynamoSessionAdapter each have their own exceptions which are thrown. For more details on these, see the DropletsDynamoBridge package API documentation.
Every Droplets user session has its own instance of the DynamoSessionAdapter, which gives it access to session-specific Dynamo components. This Adapter connects to the bridge using RMI, which means that Dynamo's RMI service must be running and that the bridge must be configured as an exported RMI service (more on that in Deployment). Adapter objects are not reusable; when a session ends they are destroyed, and so a new adapter object must be created for each session.
The Bridge resides on the Dynamo Server and allows Client code to retrieve Dynamo components. These components are either remote objects, in which case the RMIC compiler must have been run on them, and the getSessionComponent() and getGlobalComponent() objects will return a remote reference to them; or serializable, in which case those getSessionComponent() and getGlobalComponent() will construct and return a copy of them.
The Droplets-Dynamo Bridge classes are contained in a .jar file that is included as a part of the Droplets Platform SDK. The other two necessary files, a .jhtml and a .properties file, are included in the SDK as well.
Application Development
Writing to the DropletDynamoBridge is straightforward, and involves the instantiation of a DynamoSessionAdapter object for each user session, and the use of this object's two getComponent() methods each time the presentation layer must interact with the business logic. The only part of an existing Dynamo-based application that you have to alter for the Droplets Platform is the presentation layer, which will reside on the Droplets UI Server. The presentation layer will be re-written to conform to the Droplets Platform model, in which an Application object contains a Window, the Window contains one or more Panels, the Panels contain all Components, and Event Listeners are wired to the Components as required. For full details of writing to the Droplets Java API, see the Hello World Java tutorial.
In order for the Droplets UI Server to communicate with the Dynamo Server's business logic, a few steps need to be followed in writing your presentation layer:
1. Import the com.droplets.dynamo package.
import com.droplets.dynamo;
2. Create a DynamoSessionAdapter object.
This should be done in the Window object's start() method by declaring an Adapter variable within the Window object:
public class MyMainWindow extends Window
{
private DynamoSessionAdapter m_dynamoSession;
...
}
and then instantiating it as follows:
m_dynamoSession = new DynamoSessionAdapter("dynamohost", 8860);
8860 is the port through which the Droplets UI Server speaks to the Dynamo Server.
3. Destroy the DynamoSessionAdapter.
This should be done in the Window object's stop() method:
protected void stop()
{
m_dynamoSession.discard();
}
You'll also need to call the Dynamo Session whenever your application needs
to access objects within Dynamo, for example when a
UI component triggers an event that requires interaction with Dynamo business
logic. This
will allow the Dynamo business logic to react to the event on the UI. Below
is an example of a ClickListener
that is associated with a UI button. Whenever the button is clicked, a counter
is incremented:
private DynamoSessionAdapter a;button.addClickListener(
new ClickListener() {
public void handleClick(ClickEvent e) {
DynamoCounter dc = m_dynamoSession.getSessionComponent("/mycomponents/mycounter");
dc.increment();
}
}
);
For more details on programming to the Droplets-Dynamo Bridge, consult the DynamoBridge API documentation.
Deployment
General issues related to deployment of the Droplets Platform and the Dynamo ATG application server are addressed in their respective documentation (click here for information on Droplets Platform deployment). This section deals only with Droplets-Dynamo Bridge-specific deployment issues.
The Droplets UI Server and Dynamo Application Server need not be — and probably will not be — deployed on the same machine. This presents no problem provided that the .properties files outlined below are configured properly.
The Droplets SDK includesa .jar file named DynamoBridge.jar that (upon installation) is placed at:
C:\dropletsdk1.0.0\java\dynamo\dynamo_files
This .jar file contains all Java classes necessary to operate the Droplets-Dynamo Bridge. The Droplets Server will be able to unzip and access these files from the .jar file without further configuration, but you'll have to place this file on the Dynamo Application Server's host machine as well, and include it in the Dynamo Server's Classpath; consult Dynamo ATG documentation for details on how to set the Dynamo Server's Classpath.
Included in DynamoBridge.jar are the following files:
DynamoSessionAdapter: Used by the Droplets Server
DropletDynamoBridgeImpl: Used by the Dynamo Server
DropletDynamoBridge: Used by both servers
InvalidSessionIDException: Used by both servers
SessionCreationException: Used by both servers
Additional files:
In addition to DynamoBridge.jar, the following two additional files must be manually placed within the Dynamo Server. As with the .jar, these files are also located within your SDK directory at:
C:\dropletsdk1.0.0\java\dynamo\dynamo_files
DROPLET_componentRetriever.jhtml: Must be placed in the Web server's root directory, corresponding to the relative path configured in the jhtmlPageName property in DropletDynamoBridge.properties; see Dynamo ATG documentation for more on this. If that property is left out, the default location for DROPLET_componentRetriever.jhtml, is the Web server's root directory.
DropletDynamoBridge.properties: Must be installed in Dynamo's CONFIGPATH such that the instantiated component name becomes "/com/droplets/dynamo/DropletDynamoBridge". Normally, this means that the file must be placed in a directory tree entitled com/droplets/dynamo beneath some directory specified in Dynamo's CONFIGPATH. In addition, there are three properties that must be set within this properties file, provided the defaults do not apply; these are necessary because the Bridge is in effect contacting Dynamo's Web server, and must thus specify that Web server's HTTP port and hostname. These are outlined below:
- httpPort - the port number on which Dynamo's HTTP server is listening. The default is 8840, which is the default port used by Serverina, Dynamo's built-in Web server. Since most production environments use Dynamo Application Servers in conjunction with other, independent Web servers, you will usually need to change this.
- jhtmlPageName - the path to DROPLET_componentRetriever.jhtml used internally by the bridge to retrieve session components. The path should include the file's full name and be supplied relative to the HTTP server root; you can change the .jhtml file's name if you wish. The path should NOT begin with a slash, but should contain slashes as appropriate.
Dynamo configuration:
Before deploying, you must also configure Dynamo's RMI server in order to expose the Droplets-Dynamo Bridge as a remote service. In order to accomplish this, the following line:
/com/droplets/dynamo/DropletDynamoBridge
must be added to the "exportedServices" property of the Dynamo component by the name of:
/atg/dynamo/server/RmiServer
In Dynamo 5.0, this can be done using the Component Browser in Dynamo Control Center. In Dynamo 4.1, you must create an RmiServer.properties file, place it somewhere in Dynamo's CONFIGPATH under the directory structure atg/dynamo/server, and include the following line:
exportedServices+=/com/droplets/dynamo/DropletDynamoBridge
See the ATG Dynamo application server's documentation for more details on this.