Introduction
Files included
Running the Project Wizard
The Application Factory
The Main Window
Running Hello World
Droplets are extremely easy to write. They are based on the Java AWT/Swing paradigms that you are already familiar with, and do not require that you learn any additional skills. The Droplets Project Wizard makes this process even faster, as it generates the application factory and main window for you.
In this tutorial we go over the generating, writing and running of a simple Hello World Droplet in Java. The whole process takes only a few minutes, at which point you will have created and deployed the GUI below:
 Important Note:
One misunderstanding that comes up often when developers begin to look at the
API regards the fully remote nature of Droplets. It’s important to remember
that we are not writing some sort of specialized client. Every single line of
your application code will stay on the server, and so in all that we do below
we are writing strictly to the server.
Important Note:
One misunderstanding that comes up often when developers begin to look at the
API regards the fully remote nature of Droplets. It’s important to remember
that we are not writing some sort of specialized client. Every single line of
your application code will stay on the server, and so in all that we do below
we are writing strictly to the server.
Hello World consists of two files:
You can find the full source code for this example in your Droplets SDK installation at java\examples\HelloWorld.
HelloWorldJavaAppFactory.java is where you create the application, assign it a name and an application window, and decide whether or not it requires authentication by the end-user immediately upon start-up.
HelloWorldJavaMainWindow.java encapsulates the application GUI. This is where we will create an application window and place any necessary components into it.
Both of these files are generated automatically by the Droplets Projec Wizard. All you need do is add a "Hello World!" label to the main window.
The Droplets Project Wizard allows you to quickly create fully remote Droplets applications that have all the functionality of local software. The Wizard generates the code necessary to start your Droplets project, including a full Application Factory based on the input that you enter into the Wizard's text fields, and an empty main window into which you can place your components.
The Project Wizard also automatically generates a project directory, a build batch file, a standalone DRP file and a Web page in which your Droplet is embedded and can be dragged off onto the desktop. As soon as you run the build file, your Droplets Server will host your Droplet as well.
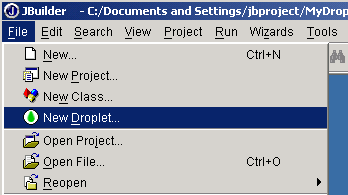
To start the Droplets Project Wizard, go to your Start Menu and select Program Files | Droplets | New Droplet Wizard:
You can alternately start the Project Wizard from a command-line prompt. The Wizard file is located at [c:\dropletsdk2.0]\java\tools.
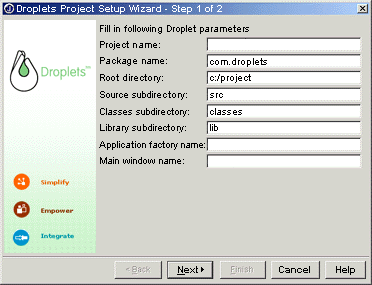
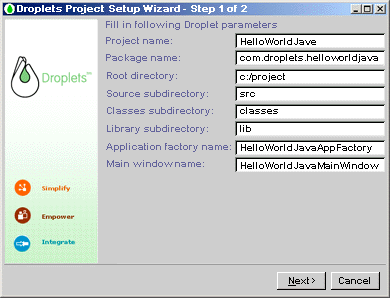
The Droplets Project Setup Wizard will now appear:
The only field which you are required to fill out is "Project Name:" at the top, which should be "HelloWorldJava". Once you fill this out, the rest will be filled in for you with defaults. You can of manually override these defaults if you wish:
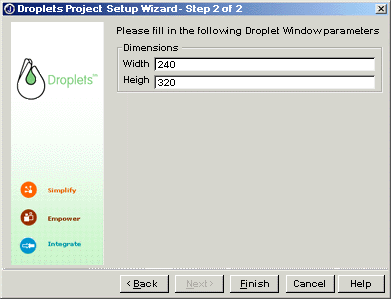
Select "Next" and the second Project Window screen will prompt you to enter the height and width (in pixels) of your Droplet's main window.
When you press "Finish", your Main Window and Application Factory
files will be generated for you, and you can start placing components into your
Main Window, wiring events and so forth.
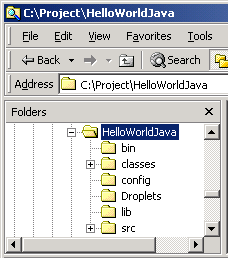
By default, the new Droplets project is created at C:\project\HelloWorldJava:
In your project's build folder you will find a batch file, build.bat, which performs all the necessary steps in compiling your Droplet, including the creation of a DRP file and an HTML file that has your Droplet embedded within it.
Your Droplet's DRP file and embedded HTML file are located at C:\project\HelloWorld. The DRP file (HelloWorldJava.drp) will activate your Droplet as a browser-free, standalone application. The HMTL file (HelloWorldJava.html) embeds your Droplet into a Web page, and includes a dragoff icon that allows you to place the embedded Droplet onto your desktop. In order to run them, you must first start your Droplets Server, which is located at Start | Programs | Droplets | Droplets Server (Console).
Let’s take a quick look at the code that was generated by the Project Wizard for HelloWorldJavaAppFactory.java. It's important to note that you will not have to write this code yourself; it will be generated for you by the Project Wizard. You can therefore skip this section if you'd rather start by adding components to your window, and don't care much how the generated code works:
|
public
class HelloWorldJavaAppFactory
extends ApplicationFactoryDefaults
{
|
The
Application Factory class of a Droplet is always an implementation
of Droplet’s ApplicationFactoryDefaults:
|
|
The Application Factory defines the interface that must be implemented in order to create Droplets Application objects. Each Application class must have its own factory class. When the Droplets Server starts, it reads the names of all registered ApplicationFactory classes from the registry. It then loads them, instantiates them, and calls getApplicationName() on each. ApplicationFactoryDefaults, which we call here, is itself an extension of the Droplets API's ApplicationFactory class, which assumes certain default values (for example, it assumes that you will not require authentication upon application startup; if you want authentication on startup, you'll have to instead use the parent ApplicationFactory class).
This is how the Droplets Server knows which Java applications it is hosting. Later, when a Droplets Client is started, it will request an application using the name returned by getApplicationName(). The Server checks that name against its registered factories, and if it finds it calls createApplication() to create an Application object to handle that Client's session. Classes that implement this interface must supply a no-argument constructor.
Within HelloAppFactory, our first task is to assign a name to our application.
|
|
Droplet’s Java SDK allows one application per application factory, and the Droplets Server discovers that name within getApplicationName(), in this case “HelloWorldJava”.
The Client, on the other hand, will read the name from the parameters in its .drp application file (the name parameter is called calc in the .drp file). The Client gets this parameter from its .drp, then calls the Server and asks for the named application. The Server responds by looking in its list of registered applications (which it gets from getApplicationName()) and sending the Client the appropriate application.
The Application Factory file also defines an Application object. As with AWT and Swing, this is where we associate the main window with its application.
| public Application createApplication(int appToken) { Application app = new Application(appToken); HelloWindow win = new HelloWindow(app); app.addWindow(win); return app; } |
The appToken argument is passed in whenever the Droplets Server calls createApplication() so that it can identify each individual Client session.
The
final task is to determine the minimum and preferred versions of the Droplets
protocol for our application. This looks a arcane at first glance but is actually
quite simple. Setting minimum and preferred protocols disallows old Droplets
Client versions from rendering GUIs with newer features; the end-user is instead
given a prompt to upgrade clients.
Before Droplets Client version 2.2, the client and protocol version numbers did not match. We therefore strongly recommend that you always set your minimum and required versions to 2.2 (0x021400) as shown below, or the latest Droplets protocol version:
public int getPreferredProtocol() { return 0x021400; } public int getMinSupportedProtocol() { return 0x021400; } |
There is also a
set of optional methods that you can add to your application factory class after
it has been generated, including methods that require login at start-up, show
a "working" dialog at start-up and define login context. For the complete
set of possible application factory methods, see the ApplicationFactory,
ApplicationFactory2
and ApplicationFactory2
classes in your Droplets Javadoc.
Droplets windows are modeled on AWT and Swing, and can be either Frames or Dialogs. When you generate HelloWorldJava, the code for its main window will look like this:
|
import com.droplets.api.*; class
HelloWorldJavaMainWindow extends Frame protected
void start() |
Once the Project
Wizard has created this code, the only work left to do is to add a Label to
the main window, with the "Hello World!" text. This must be done within
the addAllComponents() method:
|
|
![]() Important
Note: For reasons of bandwidth optimization, you cannot set instance-specific
values within the addAllComponents()
method. These should instead be placed in your window's start()
method. See the Javadoc on addAllComponents()
for details.
Important
Note: For reasons of bandwidth optimization, you cannot set instance-specific
values within the addAllComponents()
method. These should instead be placed in your window's start()
method. See the Javadoc on addAllComponents()
for details.
Creating the component instance and adding it to the Window works identically to other Java applications. GUI layout is done with methods from the Droplets SDK, and is based entirely on Java AWT's GridBagLayout class. The full details of GridBagLayout are contained in the GUI Layout tutorial in your Droplets SDK.
Once you have finished assigning values to all relevant layout settings, you need to place our component into the Window's Main Panel with a call to getMainPanel().addComponent(). Whenever you create a new Window subclass, its Main Panel is automatically created as well, allowing you to call on its methods at will:
|
|
A few simple steps are required when running Java applications that use the Droplets API.
1. The Droplets SDK must be installed on your machine.
2. You must also have installed a version of either the JDK or JRE that conforms to the JNI 1.2 specifications. This includes Sun's JDK 1.2, 1.3 or 1.4 (either Classic or HotSpot Client), but not JDK or JRE 1.1.x.
3. Compile your code by running the build.bat file which is located in your project file (by default, C:\project\appName\build).
5. Run your Droplets
Server console, which you’ll find in your Start Menu at "Programs
| Droplets | Droplets Server (Console)".
The Console application should show that it is running HelloWorldJava. If you encounter any problems getting the Droplets Server to load your Java applications, check your Droplets Server Log (located at Droplet\Logs\system), which records messages regarding Droplets Server activity which may be helpful in diagnosing the problem. A new system log file is created for each day, and is named according to the format systemyyyymmdd.log.
6. Run HelloWorldJava.drp, which is located in your project directory's "Droplets" folder. The following Droplet should appear on your screen.
7. You can also run HelloWorldJava.htm, which is located in the same folder. When you open this Web page, the HelloWorldJava Droplet should appear embedded within it, with a drag-off Droplets icon which allows you to drag the application directly out of the Web page and onto your desktop (without application download) as a desktop icon. Drag the Droplets icon out of the Web page and onto your desktop to confirm that all is well.
Congratulations! You’ve just built your first Droplet. Continue on with the Droplets Tutorials in order to see examples of more fully functional Droplet applications.