The Droplets Software Development Kit is an extensible platform that allows developers to write their own custom components which can be displayed within Droplets applications. This document shows you how to write and deploy a Droplet that integrates your own custom component extensions.
You can see three example Custom Components within your Droplets SDK installation. These are located in the Examples directory as outlined in the table below. Please note that improved version of the Slider and Tabs components have been included as a part of the Droplets Java API; the custom versions are included here as illustrations of how to write custom components:
| Component Name | Description | Sample Code | Documentation |
| Countdown | Label that displays a number and begins visibly counting down upon a call from the Droplets UI Server. | Click here | Click here |
| Slider | A component that allows users to graphically select a value by sliding a knob within a bounded interval. | Click here | Click here |
| Tabs | A row of clickable notebook tabs. | Click here | Click here |
You should
also consult the Droplets Java
API documentation on the CustomComponent
and ComponentAdapter
for specific information on constructors and methods for these two classes.
When writing a custom component, you also need to be concerned with deployment and the technical requirements of the Droplets Client for each platform on which you intend to use your component. With non-custom components, this is handled for the developer by the Droplets Platform.
You will need to write three Java classes in order to create and deploy a custom component with Droplets:
- Server-side
proxy: This is what application developers will be using in
their code, and should be derived from com.droplets.api.CustomComponent.
It is responsible for routing requests to the Client-side ComponentAdapter.
- AWT
component:
Derived from java.awt.Component,
implements the GUI of the custom component. The Droplets Client will
directly manipulate the AWT Component to handle generic requests from
the com.droplets.api.Component,
such as setting the background color.
- Client-side component adapter: Derived from com.droplets.client.ComponentAdapter, this is a controller class for the AWT Component, mapping attributes and actions specific to your component to the AWT Component.
![]() Important
Note: When developing custom components for the Droplets Platform,
you will need two separate JDKs — one for the AWT component (JDK
1.1.x) and the other for the server-side proxy (JDK 1.2 or higher).
You'll also have to set two environment variables corresponding to these
JVMs before building:
Important
Note: When developing custom components for the Droplets Platform,
you will need two separate JDKs — one for the AWT component (JDK
1.1.x) and the other for the server-side proxy (JDK 1.2 or higher).
You'll also have to set two environment variables corresponding to these
JVMs before building:
- JDK_HOME:
home of the JDK version that you'll use to build the server-side code.
This should be JDK 1.2 or higher.
- JDK11_HOME: home of a JDK 1.1.x installation. Client-side components must be JDK 1.1 compatible.
How does
it work?
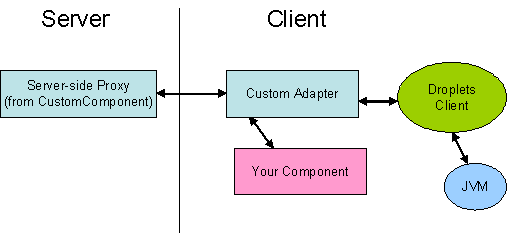
Droplets uses the Java Virtual Machine to render GUIs on the client-side. Your component is not included in the Droplets Java API (since you just wrote it yourself), so you therefore have to use AWT's Component to derive your custom widget, which will have to be placed on the client machine. This AWT component will be included in a zip file with a ComponentAdapter, which will allow your new component to interact with the Droplets Client, and thus the JVM. The ComponentAdapter also enables contact between your component and the CustomComponent server-side proxy, which allows your component to respond to server-side logic as appropriate.
The custom component itself is an AWT components that you will have to deliver to your end-user desktops (in a zip file along with the Component Adapter) in order for them to work within Droplets. They are not written using Droplets Java API components. You should instead derive them from java.awt's Component class. Consult Java documentation for details of writing AWT components.
The server-side proxy is derived from the CustomComponent class in the Droplets API. The CustomComponent proxy itself derives from Droplets' base Component class, allowing you to wire event listeners to it, set its location within the GUI layout and so forth. It also includes a set of unique methods for getting and setting various values on the client-side component.
In addition to standard LayoutPlacement and Window arguments in the CustomComponent constructor, you will include the following unique arguments:
- clientZip:
this indicates the name of the zip file which contains the client-side
custom component and adapter. This does not include the
full path, only the zip file's name, e.g. mycompany-mycomponent.zip.
- clientClass:
the name of your (unzipped) custom component class, e.g. com.mycompany.mycomponent.droplets.MyComponentAdapter.
- valueCustomAttribute
(optional): This specifies which of your custom attributes
should be treated as the value of your custom component. The setValue
and getValue events will
be routed to this custom attribute, and ValueChangedEvents
will be fired when this custom attribute is changed.
Writing the Custom Component Adapter
The custom adapter is an object that mediates communication between the Droplets Client, the client-side AWT component and its server-side proxy. Like the AWT component which you have written, it resides on the client-side and is included in the zip file which is sent to the client's machine.
The Droplets adapter class for custom components is ComponentAdapter. It is derived from java.lang.object and takes no arguments. Once you have created a ComponentAdapter and placed it in the zip file to be delivered to the client-side, you can use its methods to manipulate your custom component.
This typically means (1) translating the Droplets API attribute names and values used by the server-side proxy into the appropriate AWT component method calls, and (2) translating any actions initiated by the AWT component into Droplets attribute or action names for the server-side proxy.
There are three deployment options for custom components. One of these involves placing the component on the client-side, while the others retain the thin-client advantages of Droplets deployments:
- Deploying
as an applet
In this case, you simply place your component's ZIP archive into the applet's (which is defined within the Web page's <APPLET> tag). The ZIP archive should be stored in the Web server root, along with "dropletclient.zip". On the HTML page that contains the applet, the <APPLET> tab must include the following attribute:
archive="dropletclient.zip,MyCustomComponentArchive.zip"
If you are using the Droplets Javascript tags to generate the applet, (instead of writing the <APPLET> tag directly), you should instead add this line after the "droplet.SetProperty" lines:
droplet.AddArchive('MyCustomComponentArchive.zip');
- Deploying
as a standalone GUI
In this event you must deliver the AWT component and component adapter into a zip file to the client machine and place it in the Components folder of the Droplets Client install (on Windows this is likely to be C:\Program Files\Droplet\Components). For maximum compatibility with the various platforms and browser environments in which the client might be running, the client-side code should be in a ZIP archive rather than a JAR, and should be compiled with JDK 1.1.x rather than 1.2 or 1.3.
Note: As of the current release, if you use this method to serve the Droplet as a standalone application you cannot simply select "Add to Webpage..." from the Droplets Menu and then serve the Droplet as an applet. This issue will be fixed in the next Droplets SDK release.
- Combined
deployment
The Droplets API maintains a Custom Component Repository for Droplets Inc customers, which allows you to serve the component remotely with the rest of your Droplet application. Contact Droplets Inc by email for information on adding your custom component to the repository.
![]() Important
Note: You cannot currently deliver Droplets with custom components
as signed applets.
Important
Note: You cannot currently deliver Droplets with custom components
as signed applets.
![]() Return
to Droplets SDK Documentation Home
Return
to Droplets SDK Documentation Home